DIY Safety Pin Christmas Angels
DIY Angel Ornaments!

How To Make DIY Safety Pin Christmas Angels!
Hello again sweet friends! I said it was coming and here they all are pouring in! Christmas posts that is… Lots of inspiration coming your way and I am thrilled! Today I am joining Krista from The Happy Housie for Christmas crafts. Mine is a special craft to me… These little DIY safety pin Christmas angels were something that my Grandma used to make.

She gave a set to my family that was passed down to me as an adult. I loved these ornaments as a little girl and remember playing with them over and over any time Christmas came round. Even though she was gone before she had the chance to teach me… I took one of her angels and recreated it the best I could. Which is what I am sharing with you now. I took a lot of photos, as the process is detailed, but so worth it in the end!
Here is what you will need:
- Glass or plastic beads of varying sizes.
- Metal Wire
- Wire cutters and a pair of pliers (for twisting wires tightly)
- Safety pins (size 2 work best for the angels shown here). I used 13 safety pins for each angel.
- Wooden beads (this will be the head so you can decide how big or small you would like it).
Here is how you will make these sweet angels!
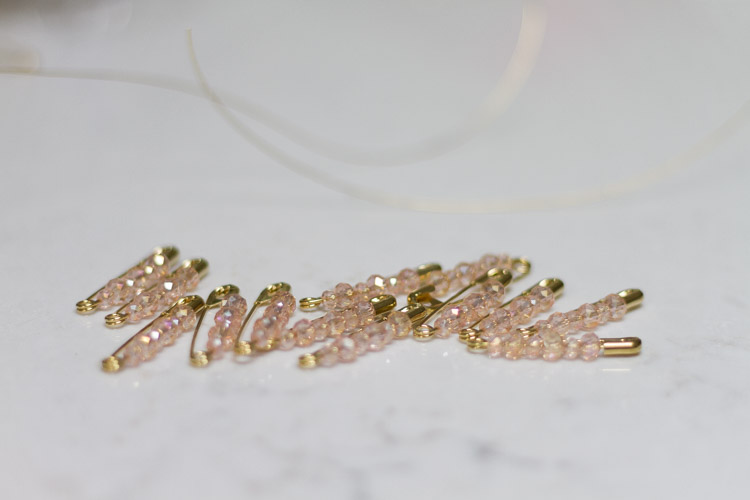
Begin by adding beads to your 13 safety pins. Cut two lengths of wire. I cut extra because it is always better to have more than less once you get going with projects like this. I cut one about 10 inches in length and one 20 inches in length.
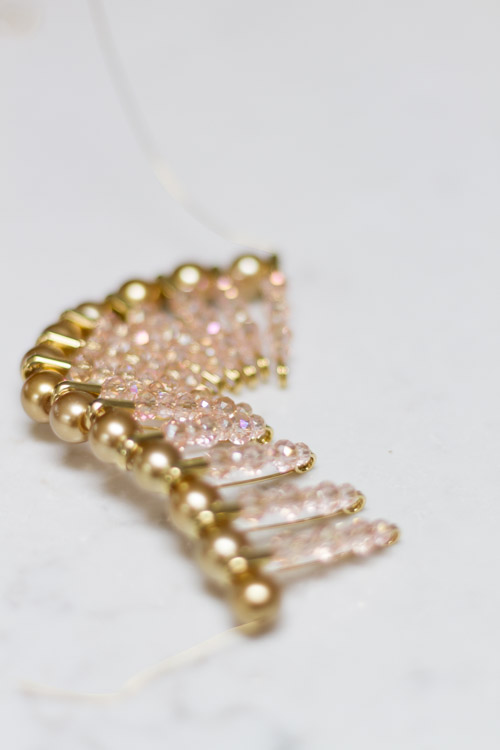
Take the shorter wire and fold one end over a bit so the beads do not fall off. Now begin threading a beaded safety pin (closure side down) and follow it with a larger bead. Repeat this until you have put all the safety pins on.

Take the longer sized metal wire and thread the top of the safety pins. You will not have beads in between these.

Once you have the skirt shape, you will twist the bottom wires together and closed. Same with the top wire too. Make sure to twist the top and bottom a few times so that they are secure. You will cut the bottom wire and bend it out of the way.DO NOT snip the top wire you just twisted.
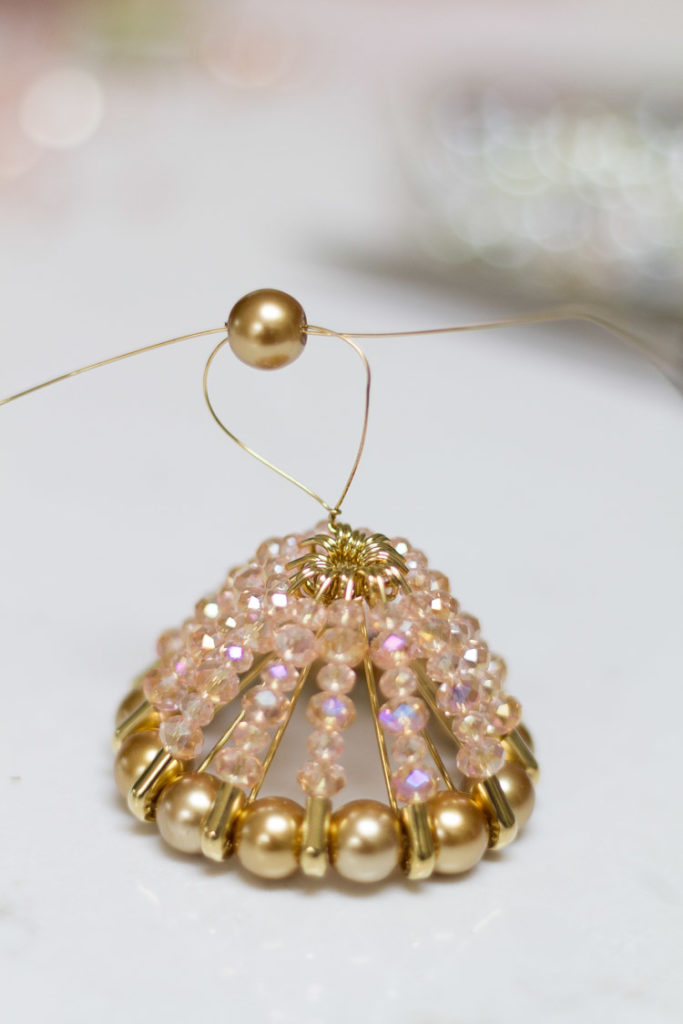
Take the top two joining wires and thread them on opposite ends of another large bead. This will be the body.

Pull the ends tight so the wire comes fully out. Each side will be what you use for the wings.

Thread smaller beads on each strand of wire. I used about 15 small beads for each wing.

Twist the wings and wires tight/closed. Again DO NOT cut this wire. You will be building with it still.

Take the two wires remaining from the wings and bring them to the top of the body bead. Twist them together, closed on top.

Thread both wires into the head bead.

On only one wire coming out of the head, will you then put on smaller beads to make the halo. Take both wires at the end and twist them to close off the halo. Snip off the remainder of wire from the halo now.

Next you use that extra wire you just cut from the halo to make the arms. Push it through the body bead (if this bead is large enough, it should all fit!

Lastly, thread smaller beads to make the arms (I used about 8). On one side of the arms you will put a middle sized bead because this is where the arms connect.

Join the arms together and twist them closed. Cut the remainder of wire. If you have any twisted/cut wires that are sticking out, use your pliers to tuck them away.
And there you have it! I know this was not one of my easiest projects, but it sure was special! I plan to make some more of these for my kids to enjoy as well. We have the few we have made hanging on the tree here now.

Don’t forget to go and visit my friends below who are also sharing some fun Christmas Craft ideas!

Classic Christmas Light String Garland DIY at The Happy Housie
DIY Hydrangea Christmas Wreath at Two Twenty One
Chunky Knit Vase DIY at Craftberry Bush
Holiday Place Card Wreaths with Printable Tags at Tatertots and Jello
Easy Christmas Star Garland Gift Topper at The Handmade Home

DIY Winter Wonderland Snow Globe Forest at a Pretty Life
DIY Cotton Ball Wreath at Hallstrom Home
DIY Faux Etched Christmas Mirror at Confessions of a Serial DIYer
DIY Christmas Book Craft Project at Happy Happy Nester
DIY Christmas Place Setting Name Tag at She Gave it a Go
Elegant DIY Dollar Tree Christmas Village at The DIY Mommy
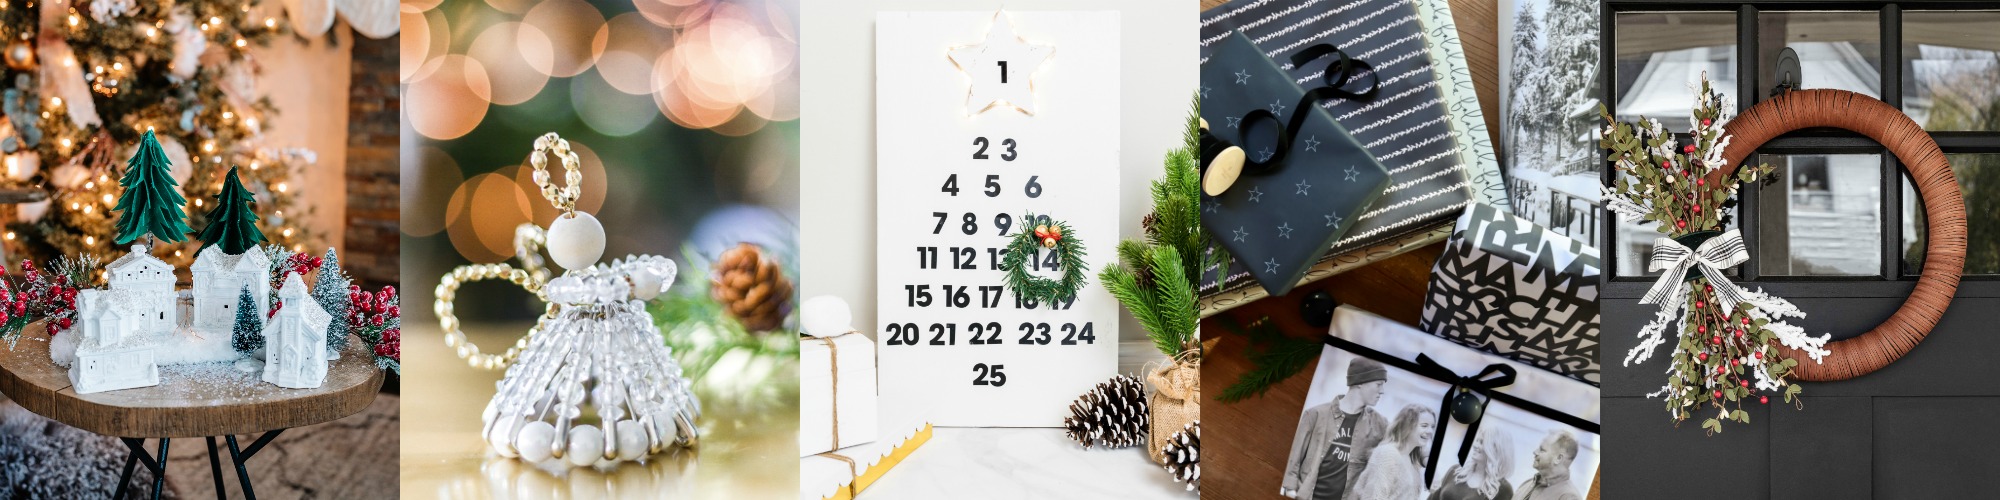
DIY Safety Pin Christmas Angels at Zevy Joy
DIY Wooden Advent Calendar at Jenna Kate at Home
DIY Holiday Gift Wrap at My Sweet Savannah
How to Make a Modern Christmas Wreath at Cherished Bliss
DIY Giant Pine Wreath at Love Create Celebrate
Paint by Numbers Printable Christmas at Rambling Renovators
DIY Winter Wreath at The Turquoise Home
Christmas Art Work at Life is a Party
Dollar Tree Rustic Glam Christmas Wreath at All Things With Purpose
DIY Vintage Whitewashed Nutcracker at Rooms FOR Rent
DIY Drum Tree Collar at Sincerely, Marie Designs
Line Art Christmas Tree DIY Acrylic Sign at Lemon Thistle
Snowball Cookies in a Jar at Clean & Scentsible
DIY Pink Ombre Ornament Wreath at We’re the Joneses


These are the sweetest angels! I love the nostalgic DIYs.
Ashley thanks so much!
These are absolutely adorable Annie! I love how delicate and subtle she is. Such a pretty idea!
Amanda thank you friend!
These are super cute! I pinned them to my holiday board so I can make some with my kids!
xoxo
Jennifer thank you! I appreciate that so much!
How beautiful is that angel! I will attempt to make some as my Xmas gift to all my family members. I love making something special every year and this is going to be so special. Thank You!
Cil that make me SO happy to hear! Thanks very much!
Annie! These angels bring back memories as a child!!! I love them and plan to make them with my girls!! Thank you for sharing!!
Shae thanks so much for visiting and that blesses my heart! So glad to hear this and hope you enjoy!
These are so pretty!
Rhonda thank you so much!
This angel is beautiful! I’ve seen safety pin crafts before, but none this lovely!
Lindi thank you so much!
These are so dainty and lovely! A great addition to the tree or as gift toppers. Thanks for sharing Annie.
Krista thank you sweet friend! xo
These are so sweet! As complicated as they seem, you made the instructions simple to follow! xoxo
Christy thank you! That makes me happy to hear it doesn’t seem too complicated!
Thank you so much for this tutorial! I have fond memories of playing with ornaments just like this that were made by my great-grandmother. They’ve been misplaced some point in the past 20 years and I’m so excited to be able to make my own to replace the ones that were lost. You’ve made this person so happy!
Many Thanks from the Netherlands for the tutorial, The angel is a bit crooked, but never te less a great project. Was messing around a bit with the thickness of te wire And te size of the beads.
You don’t say what size wire! I have been having a hard time. So cute and I have been wanting to make these.
Thank you
I came to comments hoping for the answer to this question!