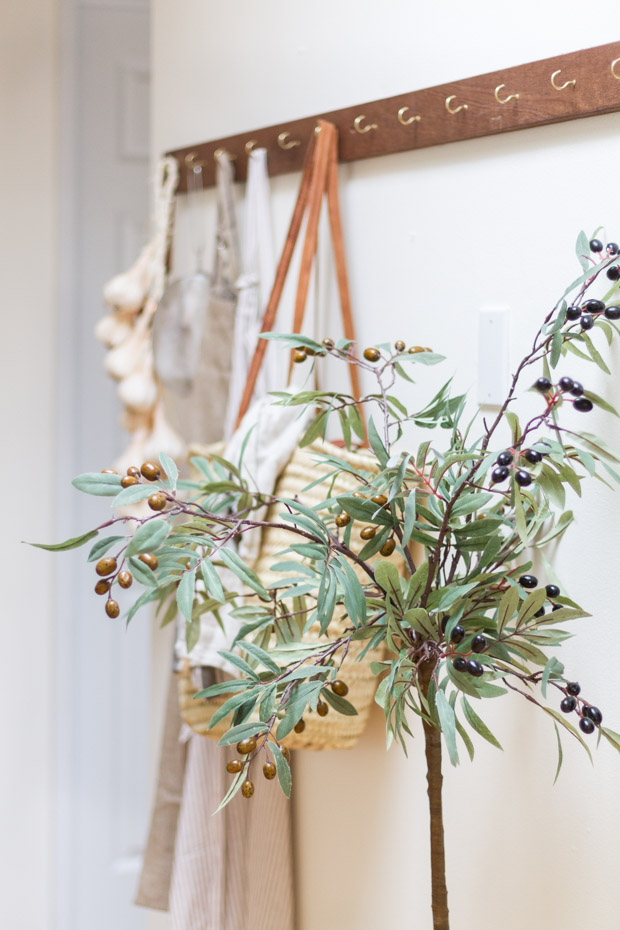
How to Make a Faux Olive Tree

This DIY olive tree project is very easy to make!
Hello all and welcome back today… I am sharing with you an updated favorite DIY of mine how to make a faux olive tree plant that I think will be very current for what will continue to be showing up in homes this coming year. Olive trees are beautiful and lately I have repeatedly heard that they will be the new “it” plant of the year ;). Whether this is true or not, they are classic and look lovely in any style of home. So of course I wanted to share how you can make one yourself!
Growing up, we had a large beautiful large olive tree in our backyard with a garden full of sweet smelling roses. It sure is funny how projects can stir up such fond memories! I never realized how fortunate we were to have had this beauty right there in our backyard and how much I would enjoy the chance to walk through that magical garden one more time…

It keeps me yearning for those lovely reminders of childhood and a tree of our own; yet it just continues to be outside of our means to buy a real olive tree (plus I am a little afraid it wouldn’t survive with my indoor green thumb, lol). So here is how I went about making one and here is how you can too…
Follow these simple steps…
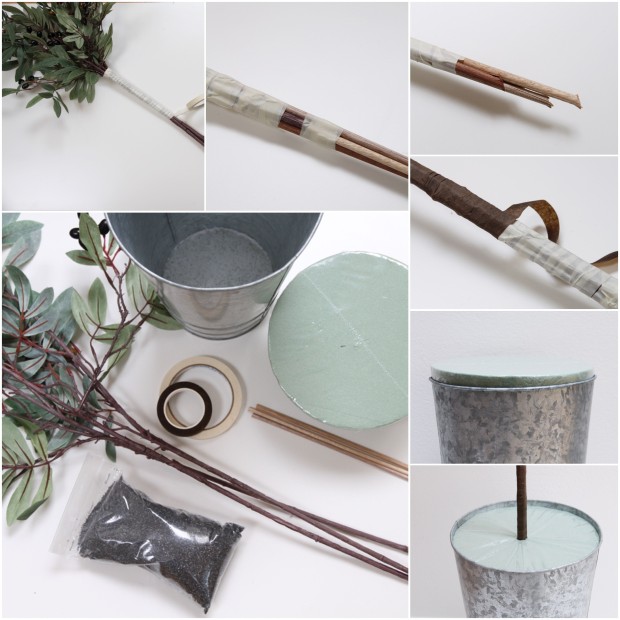
- You will need faux olive branches (I used 5), masking tape, brown floral tape, floral foam (I used a half sphered shape), wooden dowels (sized similarly to the branch stems), a bucket or pot and dark stone granules (I was able to find this at the craft store).
- First, you will use your masking tape to bunch and hold all the stems together. I varied the positions, placing some branches higher than others.
- As you continue to tape the stems together you will add the wooden dowels to the end lengths of the stems. This will lengthen/support the branches so that you can make them into a tree trunk. Finish taping around both the stems and the dowels all the way to the end.
- Trim off the ends of the dowels so that they are pointed and can easily pierce the floral foam. I was able to do this with scissors and it does not need to be perfectly even. I think this helps keep the dowels planted into the foam a bit better.
- Take your brown floral tape and tightly wrap it around the masking tape (covering it all). This tape is sticky as you handle it and it grasped the masking tape perfectly.
- Position your half sphered floral foam and carefully push it into your bucket or pot. I was able to use a bucket I already had that fit the shape perfectly. You should be able to cut it down though if you didn’t have a perfect fit.
- Pierce the foam with your newly formed trunk (using the pointed dowels). Push it in far enough so that it holds secure.
- You will cover the foam with the dark stone granules so as to create the illusion of dirt. As a reminder, you will want to be careful as this is messy and something you would not want pets or children getting into if it is sitting on the floor.
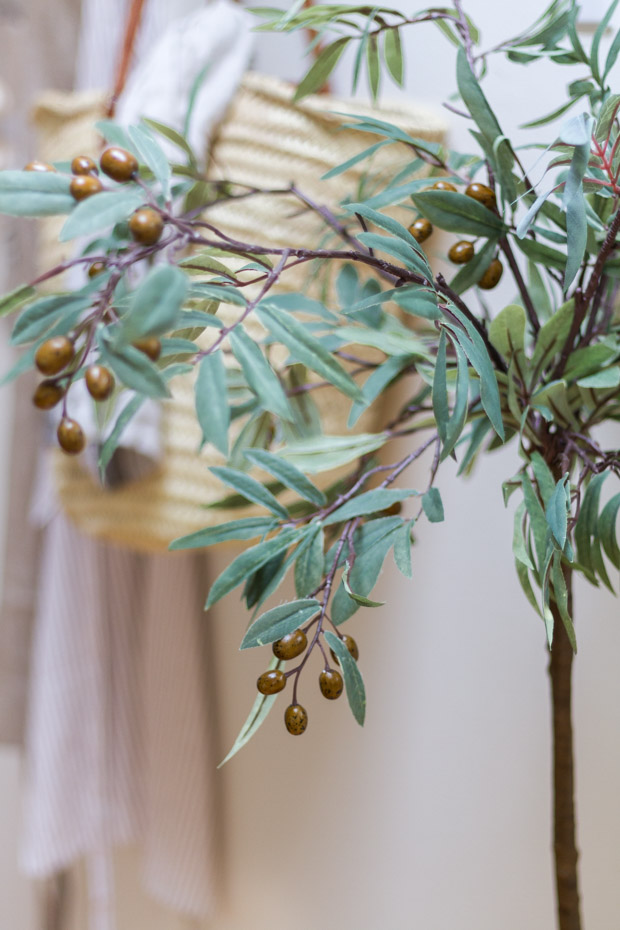
- After the fact, I decided to trim the leaves so they appeared more narrow and realistic. This is optional but if you look closely you may be able to see how the look more slim.

There you have it! This was simple, cost half the price or more and I am really enjoying the finished result. I hope you will too!

As always, there are many ways to vary this project. I think it would be wonderful to use faux cherry blossom branches or at Christmas time, make a simplified version of a Christmas tree. You can also check out my faux Christmas wreath here: Simple Outdoor Wreath With Faux Greenery
A tree or topiary of this nature fills a space without needing much more. Paired next to a chair and some old books it makes the perfect combination.

Thanks so much for stopping by and I hope that you will enjoy this project as much as I did. I have plans for some future summer lemon trees too =)…
*This “DIY Faux Olive Tree” post was also shared on Craftberry Bush March 21, 2016 – photos have been updated since then.


It looks great! I love how a plant makes a room feel alive.
Angela I do too and thanks so much for stopping by!
This is such a great idea – I am definitely going to make one.
Thanks so much Liz! I am glad you enjoyed =)!
Thank you so much for this post. I have made my own faux flower “bushes” from leftover bits and pieces of faux florals. But I never thought of making a tree! This is a great idea for all holidays. Fall and Halloween! A Maple tree! As you said, a Christmas tree! My mind is running on high octane with ideas from your tutorial! Thank you again!
Diane you are so sweet and thank you for sharing with me! That always means so much to hear that someone enjoyed the post and will even use the tutorial later! I really appreciate it =)
Well, I love this. I found one I want on Wayfair but I’m choking on the price. I’m off to make several of these. Thanks so much!!!
Heather I am so glad you think so, thank you very much!
I love it.
Marty thank you very much!
Absolutely brilliant! And SO pretty!
Kristi thank you sweet friend! xo
What a wonderful diy, absolutely love it! Where did you pick up the beautiful branches. I’ve looked for them but can’t seem to find ones as pretty as yours with the actual olives on them.
Susanne thank you so much and I am happy to hear you think so! These are from Michaels last year, but I did just see them recently again on my latest craft trip there =)…
Yeah….they are opening a Michael’s in our town, so Happy!
Wow, what an amazing project…it looks simply wonderful in your beautiful home! Thanks for the tutorial and tips!
I bought a live olive tree a couple years ago and it did not survive our home renovation. I replaced it with a fiddle/fig leaf tree and it’s gone bonkers! I’d rather have something a little smaller for the space though :)The olive tree looks perfect in your home:)
Hi. I just LOVE this tutorial for the Olive tree. Yours turned out lovely. I’m really looking forward to shopping today for the various pieces I don’t already have. I did buy a live Olive tree once but I think it didn’t survive partly because of the icky cold weather we had at the time. And I just love the look of them. So now I’ll have one that will last forever. Thanks again. Terri
I love the olive tree, do you remember where you bought your branches I got some at hobby lobby and they do not look good at all.
Hi Pamela, I am sorry to hear that. Mine were from Michaels and I believe that they still carry them. Thanks!