• Home
  • About
    • Zevy Joy
    • Disclosure Policy
  • Privacy Policy
  • Our Home
  • Recipes
  • Tutorials
  • Style
  • Budget
  • Shop
  • Contact
  • Facebook
  • Instagram
  • Pinterest

zevy joy

Designing and creating on a simple budget.

A Tour of Our Kitchen – Now

September 25, 2015 Uncategorized

OurKitchen-RightNow

Hello Friends and Happy Friday! I wanted to check in before the weekend and share some more details about our kitchen project.  This project took four times longer than we planned/imagined and was a tremendous amount of work.  I couldn’t be happier with it and am so grateful for all the hard hours put in by family.  (These pictures are the current state of the kitchen, we still have yet to calk and paint some areas – so it is still a bit unfinished).

OurKitchen-RightNow

I have learned with most projects to plan extra time and extra money because that is how most DIY on homes go.  I am hoping that sharing this project with you will not discourage you from the idea or to try something on your own. But rather, encourage you to take a chance on something you want for your home or yourself.  To see that the hard work pays off and it doesn’t always come quickly.  As silly as it may sound in situations like this when there seems to be a problem too big to fix or see around (as the many hiccups and hours this kitchen entailed) I remind myself that there is always a solution some how.  It may not be what you wanted or planned but it is there.  Get creative and persistant to find it and you will.

OurKitchen-RightNow

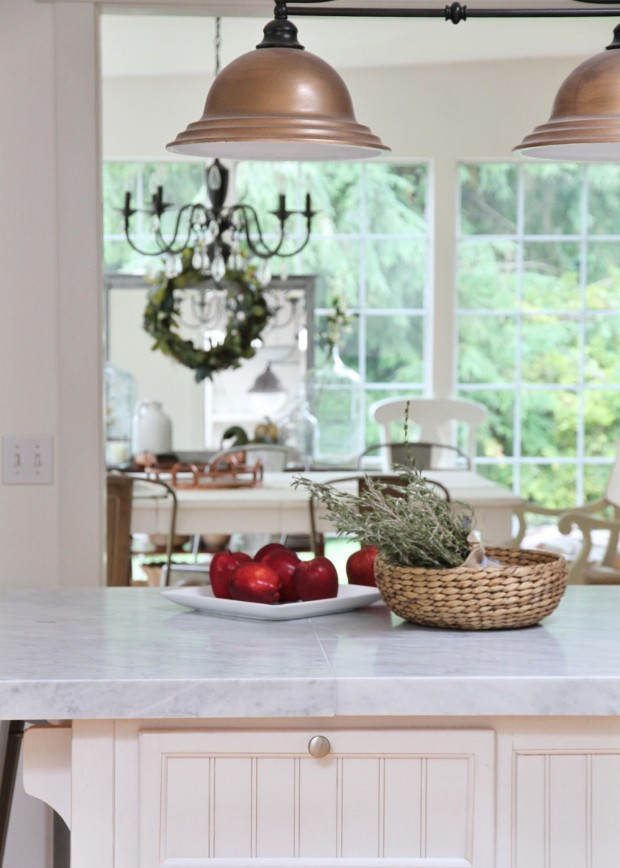
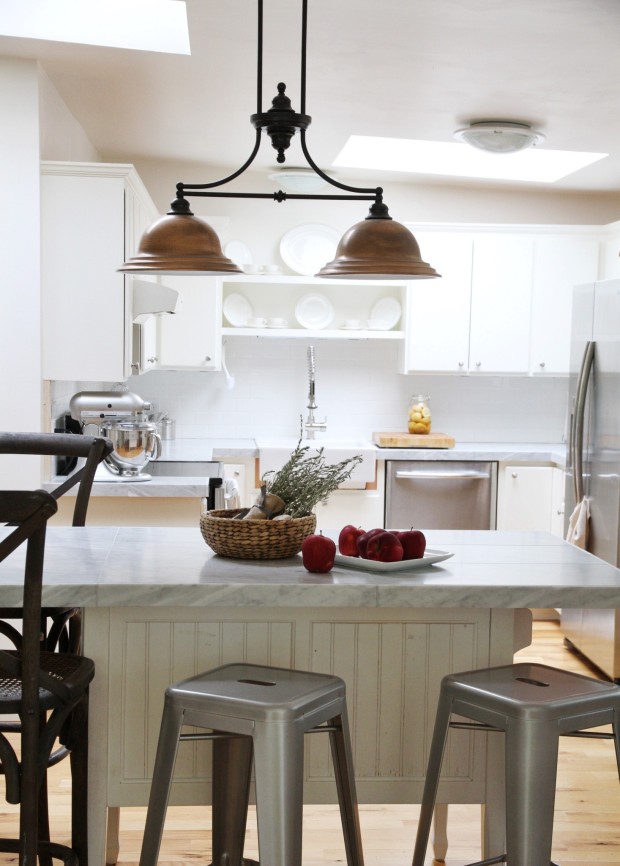
(Copper Tray – Painted Fox – Link in Sidebar)

OurKitchen-RightNow

Now onto the details of how we did this renovation on a budget (in a nutshell)…

OurKitchen-RightNow

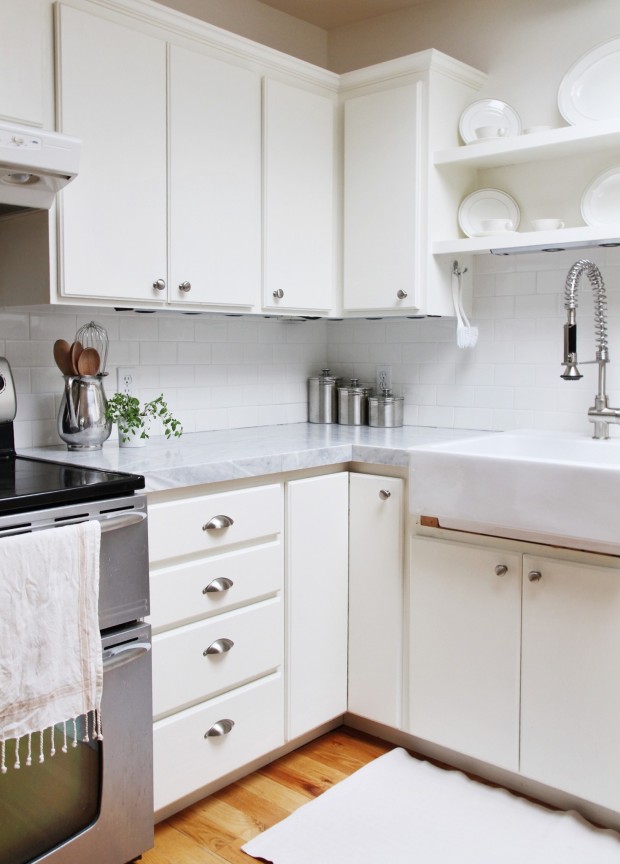
The materials we chose for this project consisted of porcelain subway tiles, and large (12 x 24) Honed Carrera Marble tiles. The entire backsplash including grout cost $100. The tiled Marble counters cost $500 including grout, sealer and thinset.  We were fortunate that my father-in-law had tools that we could use so we did not have to factor that into the cost. As you know I am always talking about our tight budget and this was a stretch for our family.  We made it possible by selling unused furniture and had some Christmas gift money to make this kitchen happen.  Even so, we really wanted to stick to the allowance we had set for ourselves and we did a pretty good job.

OurKitchen-RightNow

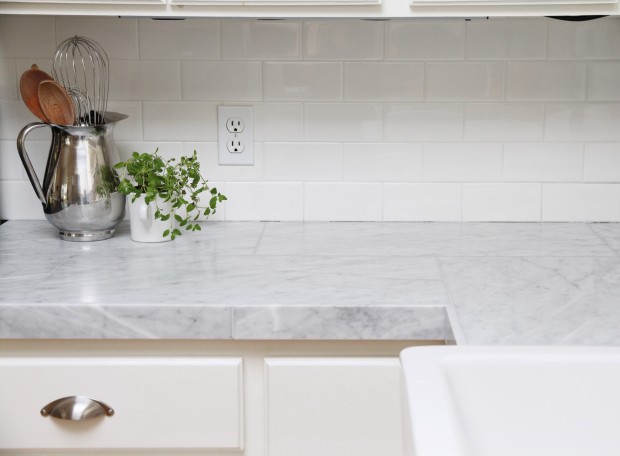
When considering the materials we wanted something that was marble or would resemble it.  I wanted a clean white backsplash too. After researching our choices, using large marble tiles was the most affordable. I knew that it would be a little different having large tiles instead of one large piece of countertop, but decided to embrace this because it would be unique to our home and gave it a bit of my own style.

OurKitchen-RightNow

We used a running bond pattern for both the backsplash and the counter.  We needed to get creative with some of the measurements and layout and ran slender pieces along the edges.

OurKitchen-RightNow

Where the problems surfaced…

Time – as I shared before this project took so much longer than we anticipated and that was a challenge when laying individual subway tiles, and honing the edge pieces of marble for the counters.

Structure – We were able to adhere the tile right on top of our old laminate counters and attempted to do the same to our butcher block island.  The problem after some time, was that the butcher block began to cup and lift the tile.  It was absorbing water from the thinset.  Therefore we removed each island tile, replaced the surface with plywood and cement board and then started the whole tiling process again.

Grout – our grout job the first time on the counters was the wrong color and even began to crack.  We scraped each grout line and replaced with a higher quality grout from our tile shop and it made a huge difference! I would definately recommend going with quality.

OurKitchen-RightNow

In addition, our sink and faucet are both from Ikea (here and here).

OurKitchen-RightNow

I know this was a lot of information and I hope maybe it will be helpful to someone down the road. Otherwise, I also hope you enjoyed the tour and thanks for caring to share the experience of the kitchen renovation with me. Have a great weekend all!

Linking to the HOST

6 Comments

SHARE
« Some Updates – Home and More
Decluttering Books – A Journey to Sparking Joy »

YOU MIGHT ALSO LIKE

  • The Inspiration Gallery
  • DIY Chicken Wire Crate
  • The Inspiration Gallery
  • A Pretty Tray and Some Artichoke Recipes

Comments

  1. Laurie@VinyetEtc says

    September 25, 2015 at 7:55 am

    Hi There, beautiful kitchen, excellent job! I am highly curious about your light fixture over the island, where did you get that from, if you don’t mind sharing?

    Reply
    • Annie says

      September 27, 2015 at 8:40 am

      Hi Laurie,
      thank you so much! The light was originally a fixture from home depot – it had frosted glass shades. I took a couple tones of copper spray paint and gave it a makeover. I hope to share a tutorial some day soon – but it was easy and inexpensive and really does look like the real thing in person =). I appreciate you stopping by!

      Reply
  2. Elizabeth@Rustic Maple says

    September 25, 2015 at 1:01 pm

    Your kitchen looks beautiful and I really like the colours you used. Great job keeping it affordable but stylish.

    Reply
    • Annie says

      September 27, 2015 at 8:41 am

      Elizabeth thank you so much – I really appreciate that!

      Reply
  3. Gee says

    September 27, 2015 at 12:05 pm

    Beautiful!! Luv the bright , crisp and clean look. Thanks for sharing the good, and bad ( as in the tile not working on the butcher block) and you answered a question for me… you can tile atop laminate. YEAH!!
    You showed that classy and beautiful can be achieved on a budget.
    Cheers, Gee

    Reply
    • Annie says

      September 30, 2015 at 10:34 pm

      Gee thank you so much! I truly appreciate your encouragement and stopping by!

      Reply

Leave a Reply Cancel reply

Your email address will not be published. Required fields are marked *


  • Facebook
  • Instagram
  • Pinterest

Looking for something?

Join the list

Popular Posts

DIY Lounge Sofa/Guest Bed

Our Pop – Up Camper

Our Patio

zevyjoy

Wife and Mama decorating and cooking with some DIY too. Sharing my story one project and room at a time | zevyjoy@gmail.com|

zevyjoy
We added the easiest DIY fountain to this area (sh We added the easiest DIY fountain to this area (shared it in stories today) and I can’t tell you enough how nice it is to hear that pretty little sound 🎵 ... I love wind chimes, chirping birds and dripping fountains... So you can imagine how fun it has been to be inside with the windows open and hearing all if those noises at once 💕. This could be a project that would be easily done with inexpensive pieces and makes a big impact for your outdoor space. Speaking of outdoor spaces, I shared ours all ready for summer up on the blog along with my friends. Come check it out if you need some easy ideas!
One bathroom for 4 people can be tricky... 🤪 Bu One bathroom for 4 people can be tricky... 🤪 But in stories I am sharing some tips and tricks for storage in a small bathroom like ours! I am talking about how we use drawers, but try to keep things pretty/functional at the same time... Come check it out and see how we think outside the box when it comes to this space! One of my new favorite tips comes from these 100% Cotton Turkish towels we were gifted from @theloomia! Not only are they pretty, they are large, but save space at the same time... You’ll have to go see what I mean in my stories, see you there! And @theloomia is offering 15% off when you use the code - Zevyjoy15 💕
I am currently working on Everly’s dollhouse and I am currently working on Everly’s dollhouse and adding some fun wall treatments/trim... I only wish real size home DIY’s were as simple as popsicle sticks and wood glue 😂! Come see what I mean on stories... But I did grab some fresh flowers for the yard and shared how I simply decorate for this favorite season of mine, summer ☀️ . It’s all up on the blog and I am joining my friends too so come say hello 💕
I listened to your votes in stories and this old t I listened to your votes in stories and this old thrifted mirror got a few coats of “Play it Cool” (the color I had on hand from our kitchen cabinets 😉). And this hallway is finally done 🎉! Here is a little before and after... The board and batten design is from @anitayokota after I saw how she used it in her pretty bedroom I knew this would put a fun modern spin in the hallway. Some fresh paint, an affordable vintage rug and updated lighting completed this long dark space. Covering popcorn ceilings will come next, but I hope this shows how a little trim and paint go a long way when working on spaces! 🌿
This past week was a time to listen and prayerfully learn. My eyes were opened and my heart convicted to speak up and to do better... While I begin to share my content here, I will strive to move forward for change and find ways to support black lives here and at home.
Please refer to @blackandembodied and @jessicawils Please refer to @blackandembodied and @jessicawilson.msrd for more about this movement. My feed will be muted here as I listen and learn. I will be in stories sharing resources that support black lives. #amplifymelanatedvoices
Clearly blue is on our mind... We both walked out Clearly blue is on our mind... We both walked out dressed sorta matching this morning 😂 This girl knows what she likes and asked to have her pink room transformed with blue... And you know when you give a mouse a cookie... 🍪 (Clearly I am the mouse 🐭 in this story 🤣) We finished up the new bead-board wall (I have trim touch up to do still) and then we are finishing spraying her little desk this afternoon. A couple vintage pieces are on the way, but otherwise I have been shopping the house for this little makeover. It’s all still in progress, but getting closer! And you all... This room is small!! So I am going to share how we tackle storage in this space so stay tuned in stories... 💕
Ever since I was little I can remember my dad tell Ever since I was little I can remember my dad telling me (who is a contractor/designer) the importance of using 3’s 💕. Now as I have made our own home, I almost always use the rule of 3’s whenever I am decorating. That goes for coffee tables, nightstands and more... I’m talking all about it and showing you some examples in stories today! And even more fun is that @boutiquerugs is offering 60% off with the code - ZEVYJOY60 ! This is the new rug we added from their collection to our bedroom here! So enjoy and have fun looking around at all their pretty selections... #boutiquerugspartner
You all know how I feel about pillows by now, don’t you?! 😂 Well in case you don’t... I think they are the best! They pull a space together affordably and make things cozy of course! You can trade them out or just keep adding to them (which is what I like to do 😉). And let’s face it, you can never have too many... Am I right? They are your artistic canvas in home decor and in my opinion there aren’t many rules to follow in the fun of mixing and matching them either! 🌿
Best of all, I’ve teamed up with 7 talented accounts to share how we used pillows to style our spaces. Head on over and check out what they’ve done... @thegingerhome 
@apriljoy_ful
@case.rutherford 
@chrissymarieblog
@farmhouse4010
@maisondecinq
@melissa_shapiro_interiors
This error message is only visible to WordPress admins

Error: API requests are being delayed for this account. New posts will not be retrieved.

Log in as an administrator and view the Instagram Feed settings page for more details.

Copyright © 2017 Zevy Joy · site design by Your Marketing BFF